Root twrp Symphony E90–
Working Rooting Method for the Symphony E90 is Now available. and You Will find it in this article So keep up Your eyes on the article from the top to bottom. Many peoples use Symphony E90 but few people know about rooting the phone . So the article For that Whom does Not Know How to Root. Root is Not Necessary for all Peoples but it Require to achieve Some advance features of the Device .
by Rooting the Phone You can improve Your phone’s performance even better. but it also Dangerous for Newby. You can get the full information about ” Android root ” from Here. We can root our phone in two ways First one using the Computer and other one Without using the Computer. The Symphony E90 is Rootable With & without a Computer just Follow below Instructions.
Note-
1. This Guide is work Only on Listed Phone So Please Don’t try it on any other Phone.
2. Flashing The ROM Will Erase all your Data, So Create a backup of your personal data before Flashing, Here
3. Please Do carefully, We are not Responsible for any damage, bootloop, or dead SD card’s.
4. Ensure that your Device at-least 50% charge During Flashing Process,to Stop the Accidentally Switch off.
5.Follow all steps correctly otherwise it cause bootloop.
6. Must backup NVRAM using this Guide before Doing anything.
Must Require:
1. backup NVRAM
2. backup Your Personal data
3. Create a nandroid backup
Require tools and Files-
| File Name | Download |
| Flash tools | Download |
| adb Folder | Download |
| adb fastboot Driver | Download |
| Magisk Manager | Download |
| twrp | Download |
How to Install twrp Recovery on Symphony E90-
No available For This Device. twrp Will be added to the article when it available and You Will be notified via Mail or Comment if Subscribed.
Please Note that this Guide Require Some additional Knowledge about Development if you Don’t have Please Don’t try it. or Do at own Risk.
How to Root Symphony E90:
Step 1 First of all we Need Stock boot File so take it from Stock ROM or You can Dup it using this tool Here
Step 2. Now Flash Downloaded official Firmware using the Listed Guide on Firmware Page.or Skip if you have Dumped Firmware.
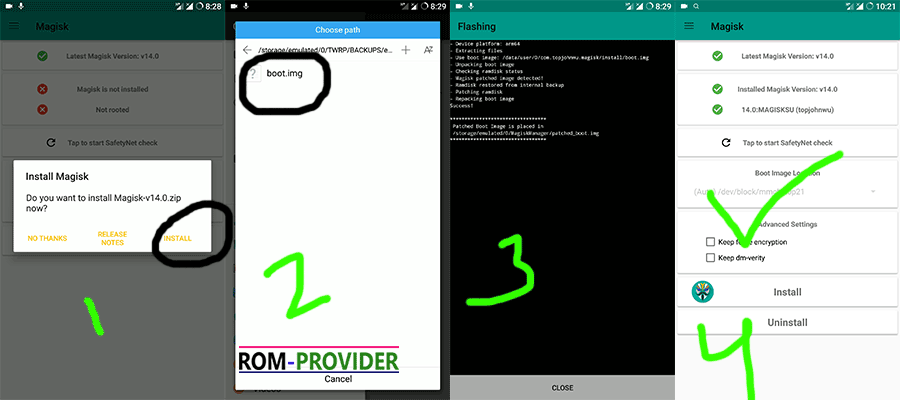
Step 3. after that fully bootup your Phone. then transfer Magisk Manager.apk file to Your Phone and Install it.
Step 4. then transfer boot.img file from Firmware folder to phone.
Step 5. turn Data Connection on and Run Magisk Manager,
Step 6. wait Some time When it say update Magisk. then Click Patch boot.img File
Step 7. then Point Stock boot.img file in Magisk [transfer to Phone in earlier step]
Step 8. and Wait while Magisk patch it. Done Patched_boot.img Placed in Magisk folder of Phone’S Storage. transfer this file to Your PC.
Step 9. Now We have 2 way to Flash it First via flash tools and Second Via fastboot..
Step 10. Via fastboot:
- Move the patched boot.img file to the adb Folder.
- Enable usb debugging and oem unlock from the Developer Options
- Connect Phone to PC with usb and type below code
-
adb reboot bootloader
-
fastboot oem unlock [if not Work use below one]
-
fastboot flashing unlock
-
fastboot format userdata
-
fastboot flash boot Patched_boot.img -
fastboot reboot
Step 11. Done. Install & open Magisk manager you can see everything in Green.
Follow Video Guide- Here
Method 2 Without PC:
- Download and Install kingroot From Here
- Install Run and Follow Screen Instructions You Will Get Root.
- Done/
Note-
- If you are unable to Done using above Guide then Follow this without PC Guide.
- if toolkit unable to unlock the bootloader Then Flash Rooted boot.img using the SP flash tools [MTK Only]