
If you have been trying to unlock the bootloader on the Redmi K80 recently, you already know the traditional Mi Unlock utility process has become incredibly restrictive. Xiaomi’s latest protection patches and community restrictions have made it a massive headache for enthusiasts who just want full control over their hardware.
Fortunately, there is a working workaround using the QLM Auto Tool that bypasses these newer restrictions via ADB.
Before we dive in, a quick reality check: Unlocking your bootloader will completely wipe your phone’s data. Back up everything important before you start.
Here is the exact process to get your Redmi K80 unlocked and rooted.
Requirements
- QLM Auto Tool
- Contact me for professional unlock service
How to Unlock the Bootloader on Redmi K80
For this method, we will be using the QLM Auto Tool for adb unlock.
-
Launch the Tool: Open the QLM Auto Tool on your PC and log in to your account.
-
Select Your Device: Set the brand to Xiaomi and select your exact device variant from the dropdown list.
-
Prep the Phone: On your Redmi K80, go to Settings > About Phone and tap the OS version multiple times to enable Developer Options. Go into Developer Options and turn on both OEM Unlocking and USB Debugging.
-
Connect: Plug your phone into your PC using a high-quality USB cable. Ensure it is connected in normal ADB mode (grant the USB debugging permission prompt on your phone screen if it pops up).
-
Execute: In the QLM Auto Tool, press the Unlock Bootloader button.
-
Wait for the Process: The utility will begin working, and your device will reboot multiple times. After one of the restarts, you will require to manually unlock your screen lock so the utility can continue communicating with the device.
-
Completion: Once the process is finished, the device will boot up, automatically format your user data, and restart one final time. Success!
How to Root the Redmi K80
Once your bootloader is fully unlocked, you can move on to gaining root access. Because modern Android devices use an init_boot partition, the process involves patching that specific image file.
-
Download Your Firmware: Download the exact stock Fastboot ROM for your device. Crucial detail: The version you download must perfectly match the firmware version currently installed on your phone.
-
Extract the Image: Unzip the stock ROM on your PC, locate the
init_boot.imgfile, and extract it. -
Transfer to Phone: Move that extracted
init_boot.imgfile over to your phone’s internal storage. -
Install a Root Manager: Download and flash your preferred root management app on your phone (such as Magisk or KernelSU / Sukisu Ultra).
-
Patch the File: Open the root app, tap Install, choose the option to Select and Patch a File, and browse your internal storage to select the
init_boot.imgyou moved earlier.
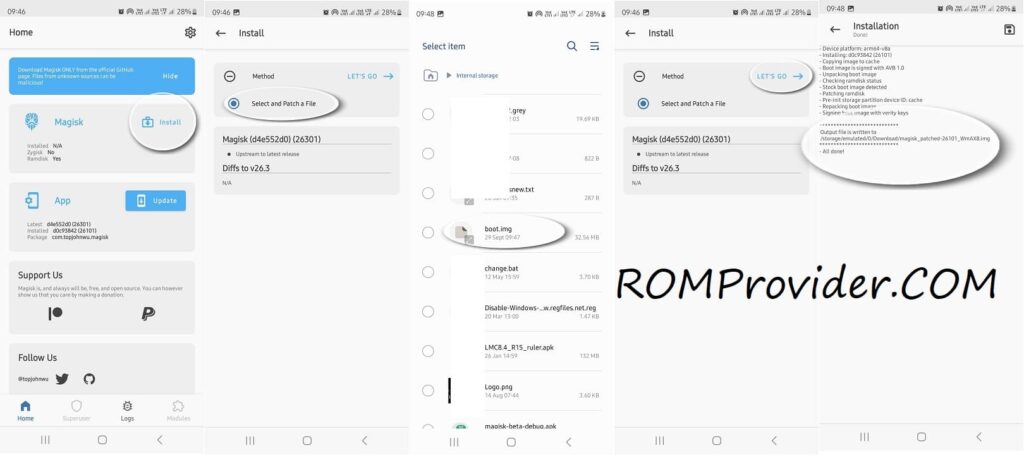
Once the app finishes patching the file, it will output a new patched image file in your Downloads directory. You can then move that patched file back to your PC and flash it via Fastboot to finalize your root access.
fastboot flash init_boot init_boot.img