
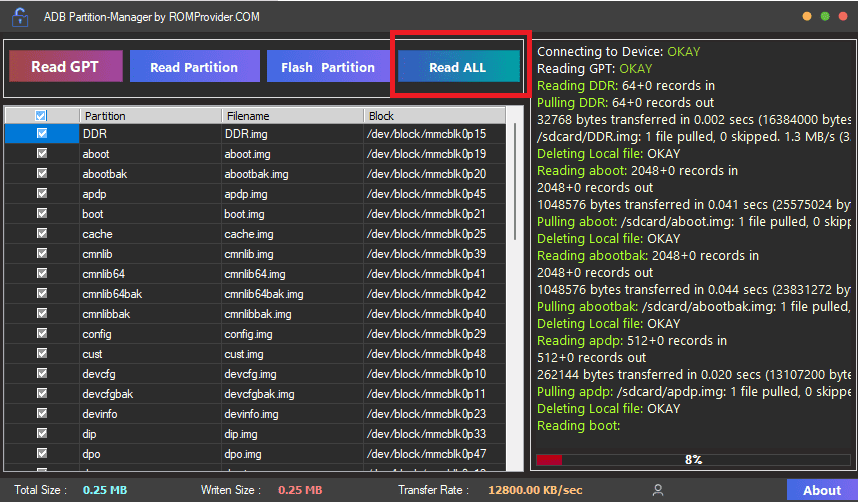
The ADB Backup Restore Tool is a powerful Windows-based software utility developed by ROMProvider.com. It allows users to dump and backup entire stock firmware ROMs directly from rooted Android devices over a standard USB configuration.
By utilizing the Android Debug Bridge (ADB) framework alongside structural shell permissions, this utility gives developers and tech enthusiasts the power to safely extract individual partition images, manage system layouts, and flash specific image blocks without needing specialized hardware boxes.
📥 Direct Download Section (Latest Setup)
Get the clean, lightweight setup package directly below. This tool functions portably and includes the required Android platform files.
-
File Name: ADB Backup Restore tool.rar
-
File Size: ~3.76 MB
-
Developer: ROMProvider.COM
Key Features of ADB Backup Restore Tool
-
Full System Firmware Dumps: Read and pull a complete snapshot of your active stock firmware ROM directly onto your PC’s storage. It copies everything required to build an unbrick package.
-
Granular Partition Control: Features an intuitive built-in Partition Manager layout that scans your system’s Partition Table (GPT) to let you extract or flash specific files.
-
Targeted Partition Flashing: Modify your device safely by overwriting specific code blocks (like
boot.img,recovery.img, orvbmeta.img) without running a full system flash. -
Streamlined UI Layout: Built on an attractive, minimalist graphical user interface (GUI) wrapper that removes the need to manually type raw command-line text strings.
-
100% Free Software: Enjoy premium development and device diagnostic capabilities completely free of charge.
How to Backup Your Full ROM Using ADB
Because this tool pulls low-level system files directly from the Android filesystem, your device must be rooted (via Magisk or KernelSU) before you begin.
Step 1: Initialize the Application Workspace
-
Download the tool archive using our high-speed Mediafire download link above.
-
Extract the
.rarfile to an easily accessible directory on your PC using WinRAR or 7-Zip. -
Open the folder, locate
ADB-Backup-Restore-Tool.exe, right-click it, and choose Run as Administrator.
Step 2: Establish Root Connection
-
Ensure USB Debugging is turned on inside your smartphone’s hidden Developer Options menu.
-
Connect your phone to your computer with a high-quality USB wire.
-
Keep an eye on your smartphone screen. When the Superuser prompt appears, grant full Root/Shell Permissions inside your Magisk application pane. (If the notification doesn’t pop up automatically, open Magisk manually and toggle the permission on for the Shell process).
Step 3: Start the Readback Dump
-
Click the large Read ALL button on the application control dashboard.
-
Keep the device completely still. The utility will systematically copy your system blocks onto your PC.
⏱️ A Quick Warning on Time: Modern smartphones utilize massive
Superpartition trees containing system, product, and vendor blocks ranging anywhere from 4GB to 16GB. The dumping process can take between 30 to 35 minutes to successfully finish. Do not disturb the cable or close the app during this transfer.
How to Flash an Individual Partition via ADB
⚠️ Expert Advisory: Flashing data to a wrong partition index can instantly hard-brick your hardware. This feature is intended for advanced users. Proceed at your own risk.
-
Open the ADB Backup Restore Tool workspace on your desktop.
-
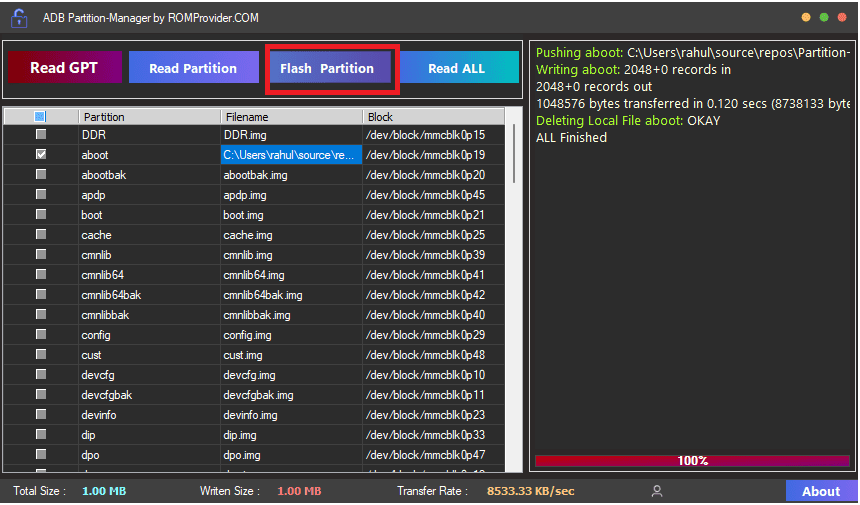
With your device correctly connected via USB debugging, click on Read GPT. The tool will instantly parse and populate a grid containing your phone’s active partition maps.
-
Scroll through the table rows, locate your targeted partition cell (e.g., boot or recovery), and double-click inside the filename field.
-
Browse your computer storage to locate the specific
.imgpatch file you want to write. -
Click the Flash Partition execution button to apply the changes. Once the log window signals completion, reboot your device safely!
🔗 Related Android Servicing Tutorials
Need to configure your initial desktop environment or learn alternative chip readback procedures? Check out these easy guides: