Penumbra (featuring its built-in TUI/CLI workspace named Antumbra) is an advanced, ultra-fast open-source MediaTek (MTK) utility written entirely in Rust by developer shomykohai. Developed as a modern, high-performance successor to traditional Python-based environments (like mtkclient), Penumbra interacts directly with low-level storage controllers on vulnerable MediaTek devices.
The tool provides professional-grade flashing, partition readbacks, and deep security modifications. Notably, it includes specialized automated memory-patching logic (such as the “Carbonara” exploit framework) that allows users to seamlessly handle bootloader unlocking and relocking on vulnerable devices without relying on heavy runtimes, complex scripts, or expensive physical hardware tokens.
Direct Download Section (Latest GitHub Release)
Get the stable precompiled compilation binaries directly via the project’s official release channels below.
| Tool Application Name | Release Build & Architecture | Direct Download Link |
| Penumbra / Antumbra Windows Suite | v1.1.0 Latest Precompiled Binary | 📂 Download Penumbra v1.1.0 for Windows |
| Penumbra Core Repository | Full Project Source Zip | 📂 Download Source Code (ZIP) |
Technical Specifications & Requirements:
-
Developer Source: shomykohai (Official GitHub Project)
-
File Structure: Portable Command-Line (CLI) / Terminal Interface (TUI) Executable.
-
Supported Platforms: MediaTek V5 (XFlash) and V6 (XML-based) chipset architectures.
-
Windows Driver Prerequisite: To let Penumbra trace your device ports cleanly on Windows, you must install WinUSB or LibUSB filters over your default MTK port mapping using a utility like Zadig.
Key Features of Penumbra
-
Rust Engine Execution: Built entirely on Rust compilation logic, delivering blazing-fast read/write port speeds and running natively without requiring Python configurations, dependencies, or massive framework libraries.
-
Automated Bootloader Unlocking: Features integrated exploit payloads capable of dropping directly into the Little Kernel (
lk) memory state to unlock or relock system boundaries on vulnerable MTK platforms. -
V5 & V6 Storage Architecture Support: Fully compatible with both older V5 (XFlash) protocols and modern V6 (XML layout definition) structural memory distributions.
-
Dual Interface Control: Operates dynamically via a standard Command-Line Interface (CLI) for seamless background scripts, or an interactive, keyboard-driven Terminal User Interface (TUI).
-
Deep Partition Maintenance: Supports absolute reading, writing, erasing, and specific hexadecimal offset data targeting across single internal device nodes.
Mandatory Windows Driver Setup (Zadig Configuration)
Because Windows attempts to bind standard serial COM drivers to MediaTek devices by default, Penumbra will fail to intercept the low-level boot state handshake unless you overwrite the default driver filter profile:
-
Download and open Zadig (Universal USB Driver Installer).
-
Connect your MediaTek smartphone or tablet to your computer via USB data wire while holding down the Volume Up + Volume Down hardware keys simultaneously to trigger the MediaTek boot loop.
-
In Zadig, click on Options and tick List All Devices.
-
Select your listed MediaTek device registration (e.g., MediaTek USB Port or Preloader VCOM) from the drop-down box layout grid.
-
Toggle the target driver type configuration fields to WinUSB or libusb-win32 and click Replace Driver / Install Driver.
How to Run Penumbra / Antumbra on Windows
Since the precompiled tool runs portably inside a command console environment, use the following operational steps to initialize its script workspace:
Step 1: Open the Local Working Directory
-
Download the Penumbra v1.1.0 Windows precompiled ZIP archive from the official direct link provided above.
-
Extract the archive contents into a clean folder path on your drive layout (Example:
C:\Penumbra\). -
Click on the explorer window path entry bar at the very top of your folder layout workspace, type
cmd, and hit Enter. This will instantly launch a localized Windows Command Prompt pointing straight at the executable files.
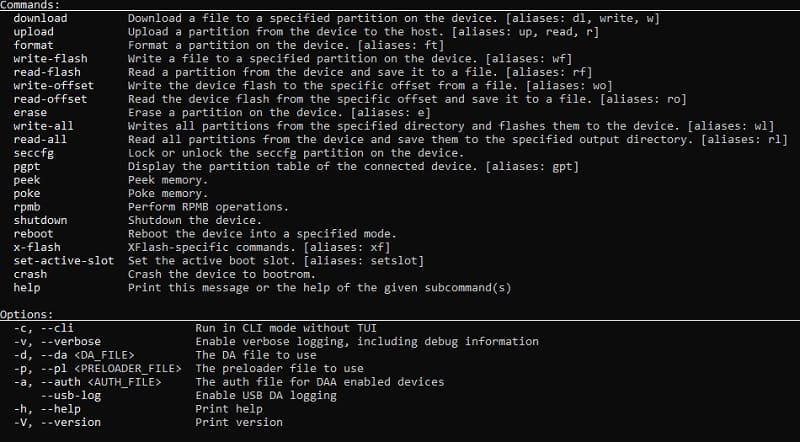
Step 2: Query the CLI Help Tree Commands
To view all available flashing parameters, commands, and options inside the console framework interface panel, type the following initialization string line and press Enter:
Commands:
download: Download a file to a specified partition on the device. [aliases: dl, write, w]
upload: Upload a partition from the device to the host. [aliases: up, read, r]
format: Format a partition on the device. [aliases: ft]
write-flash: Write a file to a specified partition on the device. [aliases: wf]
read-flash: Read a partition from the device and save it to a file. [aliases: rf]
write-offset: Write the device flash to the specific offset from a file. [aliases: wo]
read-offset: Read the device flash from the specific offset and save it to a file. [aliases: ro]
erase: Erase a partition on the device. [aliases: e]
write-all: Writes all partitions from the specified directory and flashes them to the device. [aliases: wl]
read-all: Read all partitions from the device and save them to the specified output directory. [aliases: rl]
seccfg: Lock or unlock the seccfg partition on the device.
pgpt: Display the partition table of the connected device. [aliases: gpt]
peek: Peek memory.
poke: Poke memory.
rpmb: Perform RPMB operations.
shutdown: Shutdown the device.
reboot: Reboot the device into a specified mode.
x-flash: XFlash-specific commands. [aliases: xf]
set-active-slot: Set the active boot slot. [aliases: setslot]
crash: Crash the device to bootrom.
help: Print this message or the help of the given subcommand(s)help
Step 3: Connect and Execute Core Scripts
-
Turn off your target MediaTek smartphone completely.
-
Type your chosen execution command string line directly inside your open command console window (Example string line to boot device information fields):
antumbra info -
Press Enter to put the tool into active port listening standby.
-
While the console screen reports “Searching for MTK port…”, connect your device to the computer using a high-quality data wire while holding your hardware Volume Keys.
-
The Rust execution engine will instantly register the connection handshake, push its local DA (Download Agent) loaders down the line, patch verification constraints, and finish your specified repair operation in mere seconds!