
Phoenix usbpro (also known as PhoenixUSBPro) is the official, production-grade flashing utility engineered by Allwinner Technology Co., Ltd. This specialized tool is built to write raw stock firmware images onto various consumer electronics powered by Allwinner processors, including Android tablets, streaming TV boxes, automotive smart screens, and development dashcams.
Unlike basic, generic software flashers, Phoenix usbpro features low-level storage controllers that natively support both modern eMMC and high-speed UFS memory hardware architectures. This makes it an invaluable asset for developers and technicians needing to recover dead, bricked, or non-responsive Allwinner units directly through diagnostic USB lines.
📥 Direct Download Section (Latest Setup Links)
Get the clean, verified portable software utilities and the official Allwinner configuration drivers directly below.
| Software Utility Module Name | Release Build | Direct Download Link |
| Phoenix usbpro v4.0.8 (Latest) | Stable Production Release | 📂 Download Phoenix usbpro v4.0.8 |
| Allwinner USB Driver Pack | AW_Driver Configuration | 📂 Download Allwinner USB Drivers |
Technical Specifications:
-
File Structure: 100% Portable Package (No installation wizard required).
-
Firmware Format Support: Official decompressed
.imgfactory images. -
Compatible OS: Windows 7, 8, 10, 11 (32-bit & 64-bit).
Key Features of Phoenix usbpro
-
Storage Controller Flexibility: Full native validation read/write protocols covering both traditional eMMC storage modules and advanced, high-bandwidth UFS chipsets.
-
Direct Image Deployment: Simplifies firmware upgrades by letting users select and inject compiled
*.imgcontainers directly into system memory sectors. -
Lightweight Footprint: Highly optimized layout architecture that consumes minimal system resources and runs smoothly on older Windows machines.
-
Multi-Port Batch Standby: Built-in multi-channel architecture allowing deployment setups across secondary USB hubs for simultaneous mass flashing.
How to Setup and Run Phoenix usbpro
Because the utility operates as a localized portable executable workspace, setting up your environment takes only a few quick steps:
-
Download the Phoenix usbpro v4.0.8 ZIP package along with the AW_Driver ZIP file from our download block above.
-
Extract both archives onto your computer using WinRAR or 7-Zip.
-
Open the extracted driver folder, locate the driver installer script, and run it to integrate the official Allwinner USB Drivers into your Windows operating system. This ensures the flashing environment maps your device connection port cleanly.
How to Use Phoenix usbpro to Flash Allwinner Firmware
Follow these instructions to safely load and flash your official .img firmware onto your target hardware:
Step 1: Initialize the Tool Workspace
-
Access your extracted tool folder directory.
-
Locate
PhoenixUSBPro.exe, right-click the file icon, and select Run as Administrator. -
The clean graphical interface window panel will open up on your monitor.
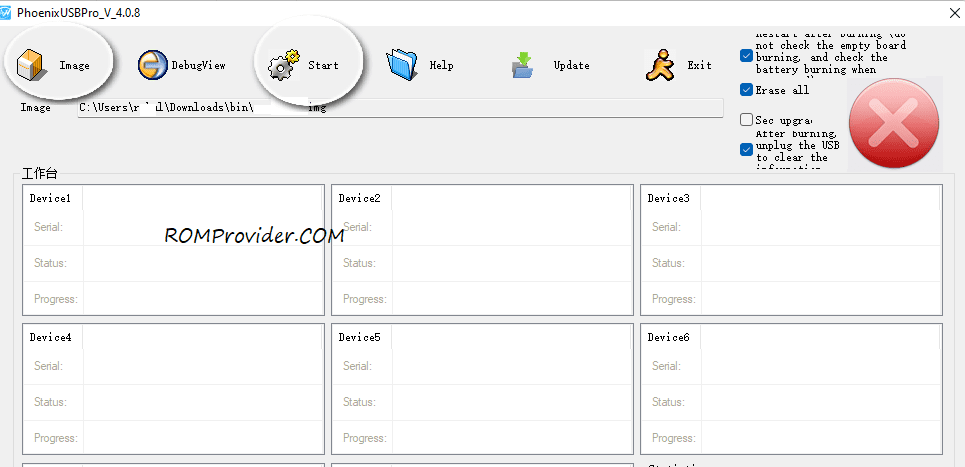
Step 2: Load Your Factory Firmware Image
-
Click on the Image option button situated at the upper menu configuration row.
-
A file directory window explorer will pop up. Browse your computer storage files to select your device’s official
.imgfirmware file. -
Note: If your firmware distribution includes an official security file, click on Certification to load your matching
.keytoken file as well.
Step 3: Put the Application into Connection Standby
-
Click on the large Start button located at the top left area of the user workspace pane.
-
The operational indicator icon inside the status grid will update, shifting the software into active listening/detection mode.
⚠️ Important Connection Rule: Do not have your smartphone, tablet, or TV box linked to the computer when you click Start. The device must only be linked after the tool enters its standby phase.
Step 4: Connect Your Device via Boot Mode
-
Ensure your Allwinner device is turned off completely.
-
Press and hold down the physical hardware Volume Up (Vol+) button. (Note: On specialized Android TV boxes without volume keys, use a non-conductive pin to hold down the hidden recovery switch located deep inside the AV or reset hole).
-
While holding the boot key down firmly, connect the device to your PC using a high-quality USB data wire.
-
Immediately tap the device Power Button 3 to 5 times sequentially in quick succession. This forces the device processor to bypass standard initialization layers and drop straight into low-level download mode.
Step 5: Monitor Progress and Verify Boot
-
Flashing Loop: The tool interface grid row will instantly recognize the connection profile, turn green, and initialize a real-time flashing update progress bar banner. You can now release the hardware buttons.
-
Completion: Leave the USB connection completely undisturbed. Once the visual progress tracker ticks up to 100%, the status log will display a confirmation success prompt.
-
Reboot: Safely unplug your device from the USB terminal port and power it on to complete the factory setup initialization!