The Spreadtrum USB Driver (officially supporting modern UniSOC architectures) is an essential infrastructure software package that allows your Windows computer to communicate directly with smartphones, tablets, and feature phones powered by Spreadtrum/UniSOC chipsets.
This driver pack is highly critical for mobile phone technicians and advanced users who need to perform low-level servicing operations. Without installing these specific USB filters, your PC will fail to identify your device when you connect it in emergency boot states. It is a mandatory requirement for flashing stock factory firmware (.pac files) using the SPD Upgrade Tool, rooting system image files, or executing partition modifications via ADB/Fastboot terminals.
📥 Direct Download Section (Official Driver Setup)
Get the official, clean verification package from our secure repository mirror below.
| Driver Package Name | Release Build | Direct Download Link |
| Spreadtrum Driver Pack (Universal) | v4.20.0201 (Latest) | 📂 Download Spreadtrum Driver v4.20.0201 |
Technical Specifications:
-
File Name: Spreadtrum_Driver_R4.20.0201.rar
-
File Size: ~20 MB
-
Supported Chipsets: SC6531, SC7731, SC9832, SC9863A, Tiger T610, T618, T700, and all modern UniSOC platforms.
-
Compatible OS: Windows 7, Windows 8, Windows 10, and Windows 11 (Both 32-bit & 64-bit architectures).
Mandatory Step: Disable Driver Signature Verification
Because Spreadtrum/UniSOC low-level flashing drivers override standard Windows storage filters to interface directly with the device processor (FDL1/FDL2 states), Windows 10 and Windows 11 will block them by default if they lack a modern digital certificate.
Before proceeding with any installation steps, you must temporarily disable Driver Signature Verification on your PC:
-
Hold down the Shift Key on your keyboard while clicking Restart in your Windows Start Menu.
-
Go to Troubleshoot ➔ Advanced Options ➔ Startup Settings ➔ Restart.
-
Upon reboot, press the 7 or F7 key on your keyboard to select “Disable driver signature enforcement”. Your PC will boot normally, and you can now safely install the drivers.
How to Install Spreadtrum Drivers on Windows 10 / 11
Method 1: Automatic Setup Installer (Quickest)
-
Download the Spreadtrum Driver R4.20.0201 RAR archive from our download block above.
-
Extract the file structure onto your desktop using WinRAR or 7-Zip.
-
Open the uncompressed folder directory and navigate inside the
Win10(orWin11) folder. -
Locate
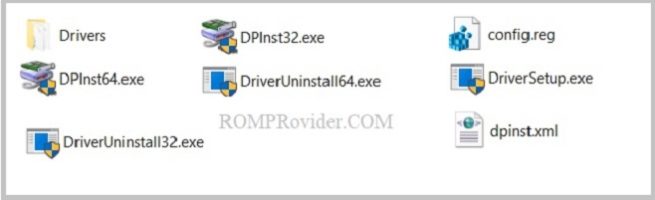
DriverSetup.exe, right-click the file icon, and select Run as Administrator. -
Follow the clean step-by-step on-screen setup prompts. Click finish once complete, and restart your computer to bind the USB configurations properly.
Method 2: Manual Legacy Hardware INF Installation (Highly Recommended)
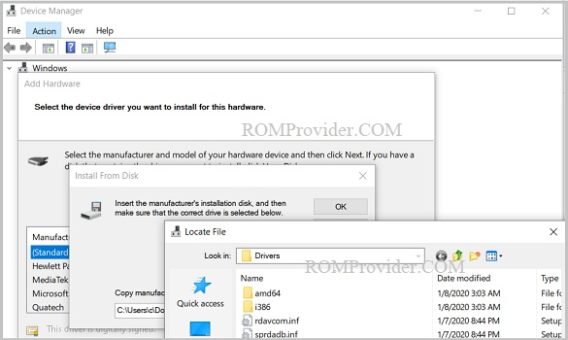
If your computer fails to detect your device during a live flash session or drops connection at the FDL1 phase, you should force-install the raw hardware drivers using the Windows Device Manager:
-
Extract the downloaded
R4.20.0201.rarfile onto your PC. -
Press the Windows Key + X and open the Device Manager.
-
Highlight your main Computer desktop icon name at the very top of the list row. Click on Action in the top menu bar, and select Add legacy hardware.
-
Click Next, select Install the hardware that I manually select from a list (Advanced), and click Next.
-
Highlight Ports (COM & LPT) from the hardware type list and hit Next.
-
Click the Have Disk… button, then click Browse.
-
Navigate to your extracted driver directory folder path. Open the specific folder matching your computer ecosystem (Example:
R4.20.0201 / Win8 / Win7 / Win10) and choose the corresponding.infconfiguration file inside. -
Click Open, click OK, and proceed to complete the legacy setup wizard installation. Windows will now map your Spreadtrum diagnostic and download strings cleanly!
How to Install Spreadtrum Drivers on Windows 7
-
Make sure you have disabled driver signature verification as explained above.
-
Extract the downloaded driver
.rarpackage onto your desktop. -
Open the extracted folder, navigate directly into the
Win7subfolder. -
Right-click on
setup.exeand choose Run as Administrator. -
Follow the quick on-screen instructions installation wizard to embed the SCI USB filter drivers into your system registry. Once finished, restart your PC!