A bricked Motorola Edge 30 Fusion is effectively useless – it will not switch on or function correctly. a bricking can happen as a result of botched firmware updates, incompatible custom ROM installations, or other software problems. You can, however, revive your Motorola Edge 30 Fusion and have it working like new again with the appropriate equipment and approaches. here We will walk you through the steps to unbrick your Motorola Edge 30 Fusion and bring it back to life in this guide.
unbrick is a process to repair a device that was bricked, with in Motorola Edge 30 Fusion user face two type of brick- soft brick and hard brick.
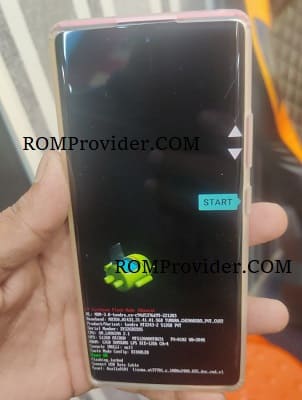
Soft brick: in this stage device stuck or freez on boot logo or animation due to any software/ firmware issue.
hard brick: in this stage device completely goes dead and does not show any sign of boot for example logo or animation, even fastboot or recovery mod. it show only 9008 USB COM driver /device when we connect it to computer
bootloader Locked Repair:
you can repair your bootloader locked motorola device after fastboot auth, even this method can be used to remove frp lock
Requirement’s
How to Flash Motorola Edge 30 Fusion on Locked Bootloader:
Contact Me for fastboot Auth >>
if hard bricked just flash blank flash to fix bootloader, once the bootloader is back you can follow below instructions.
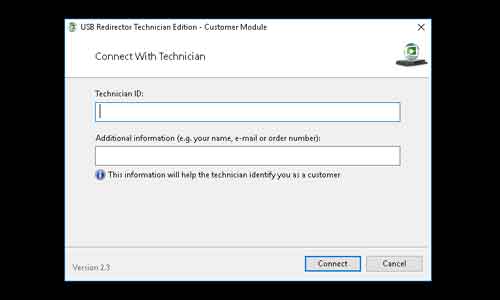
- Open USB Redirector:
- Launch the USB Redirector software on your computer.
- Enter IP:
- Enter the IP address required for USB redirection. This establishes a connection between your computer and the target device.
- Enter the IP address required for USB redirection. This establishes a connection between your computer and the target device.
- Connect Phone in Fastboot Mode:
- Put your phone into Fastboot mode. This is usually done by turning off the phone, then holding a specific combination of hardware buttons while powering it on.
- Wait for Device Authentication:
- Allow some time for the authentication process to complete. This is necessary process which allow flash on your bootloader locked motorola device.
- Open Motorola Flasher Pro:
- Launch the Motorola Flasher Pro application on your computer.
- Click “Select Folder” & Browse Device Firmware:
- Use the application to select the firmware folder for your Motorola device. This folder should contain all the necessary files for the flashing process.
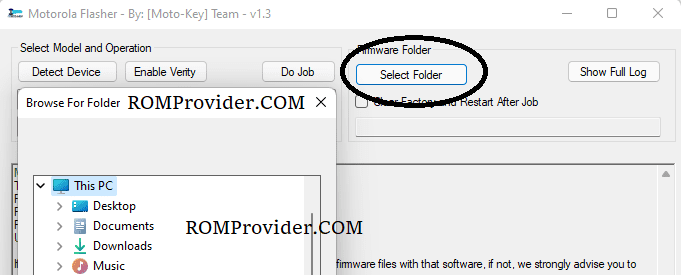
- Use the application to select the firmware folder for your Motorola device. This folder should contain all the necessary files for the flashing process.
- Click “Do Job”:
- Initiate the flashing process by clicking on the “Do Job” button. This will start the firmware installation on your connected Motorola device.
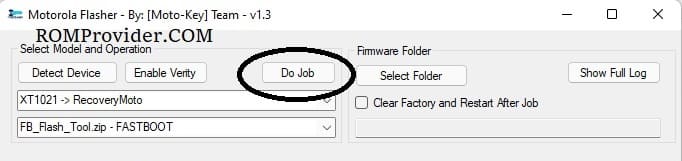
- Initiate the flashing process by clicking on the “Do Job” button. This will start the firmware installation on your connected Motorola device.
- Wait for Flashing to Complete:
- Allow the flashing process to run its course. This may take some time, and it’s crucial not to interrupt the process to avoid potential issues.
- Success:
- Once the flashing is complete, you should receive a success message or notification. Your Motorola device should now be updated with the new firmware.