The SPD Upgrade Tool (also officially designated as the UniSOC Flash Tool or UpgradeDownload) is the original, production-grade firmware installation software engineered for devices powered by Spreadtrum and UniSOC chipsets. This utility is absolutely vital for servicing modern entry-to-mid-range Android smartphones, tablets, and feature phones from top brands such as Tecno, Infinix, itel, Nokia, Realme, and Lava.
By utilizing this utility, you can overwrite broken system software, downgrade or upgrade your operating system, fix stuck boot loops, clear forgotten screen patterns, and wipe persistent Google Factory Reset Protection (FRP) security blocks. It communicates directly with the raw processor to write binary data files seamlessly.
📥 Direct Download Section (All Stable Versions)
Get the original, uncorrupted setup builds directly below. These packages run as clean, portable utilities on Windows without cluttering your system registry.
| Software Engine Build Name | Release Target Profile | Direct Download Link |
| UniSOC Flash Tool R27.23.2401 | Modern Unisoc Dimensity & Core Chips | 📂 Download UniSOC Tool R27.23.2401 |
| UniSOC Flash Tool R27.23.1902 | Stable R27 Alternative Release | 📂 Download UniSOC Tool R27.23.1902 |
| SPD Flash Tool R26.21.2801 | Standard Stable Build | 📂 Download SPD Flash Tool R26.21.2801 |
| SPD Flash Tool R24.0.0003 | Legacy Stable Rollout | 📂 Download SPD Flash Tool R24.0.0003 |
| SPD Flash Tool R23.19.4001 | Classic Legacy Engine Build | 📂 Download SPD Flash Tool R23.19.4001 |
| Official Spreadtrum USB Driver | Core SCI USB Filter Setup | 📂 Download Spreadtrum USB Drivers |
Technical Specifications & Vital Rules:
-
File Architecture: 100% Portable ZIP Packages (Extract and use).
-
Supported OS: Windows 7, 8, 10, 11 (32-bit & 64-bit).
-
Firmware Formats: Natively supports standard
.pacfirmware image bundles and rare.p5cconfiguration profiles. -
Important Warning: Flashing new firmware completely formats your device storage. Always backup your target data files before starting, as this process will completely wipe all user directories.
Key Features of the SPD/UniSOC Tool Suite
-
Streamlined Load Structure: Minimalist, user-friendly graphical interface built to minimize human layout configurations. Loading complex firmware takes just one press.
-
Native .PAC & .P5C Engine Support: Fully equipped to read, verify, and extract information from basic
.pacfactory firmware maps, as well as specialized, rare.p5cnetwork configuration files found on select legacy smartphones. -
Advanced Multi-Language OS Injection: Features dedicated NV (Non-Volatile) RAM file injection fields that allow technicians to manually append localized language configurations and regional user image maps down to the device filesystem.
-
Granular Partition Control (Research Mode): While the UpgradeDownload variant focuses on safe stock updates, its underlying core architecture can toggle specific sector wipers to skip sensitive security nodes like IMEI, calibration, and network configurations during a flash script.
How to Prepare Your Desktop Environment
Because Spreadtrum chipsets require an active handshake port verification to register on your computer, you must configure your USB filters first:
-
Download the Spreadtrum USB Driver Pack and your preferred version of the SPD Flash Tool from our download block above.
-
Extract both compressed ZIP archives using WinRAR or 7-Zip.
-
Open your extracted driver directory, right-press the setup file matching your OS architecture (x86 or x64), and install it. This ensures Windows maps your device cleanly when connected in download mode.
How to Flash Stock Firmware using the SPD Upgrade Tool
Step 1: Initialize the Flashing Terminal Workspace
-
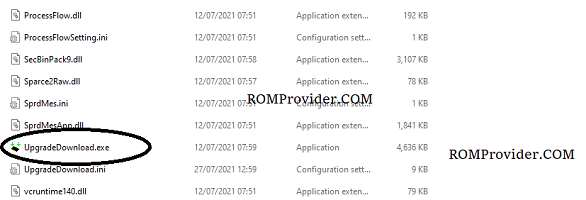
Access your extracted SPD Flash Tool folder directory.
-
Scroll down to locate the main application execution file named
UpgradeDownload.exe(orBin/UpgradeDownload.exe). -
Right-press the icon and choose Run as Administrator. The primary workspace dashboard panel will launch on your desktop.
Step 2: Load the Factory .PAC Firmware Packet
-
Click on the Load Packet button (indicated by a large Single Gear Icon located at the upper-left corner of the header menu strip).
-
A Windows Explorer navigation file box will pop up.
-
Browse your local files to select your phone’s uncompressed original stock
.pac(or.p5c) firmware file and press Open. -
Wait a few moments while the engine decompresses the packet headers and populates the firmware target name string inside the top status field layout.
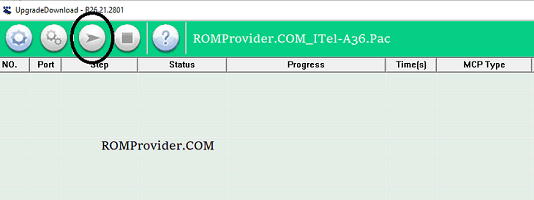
Step 3: Put the Tool into Active Download Standby
-
Click on the Start Download button (indicated by the large Play Arrow Icon positioned on the top layout grid options).
-
The software rows will shift into an active connection standby phase, listening for port registration hooks.
Step 4: Establish the Boot Mode Connection Wire
To skip standard system layers and initialize the internal Firmware Downloader (FDL) loaders, you must force a hardware boot signal:
-
Turn off your Spreadtrum/Unisoc device completely.
-
Press and hold down the physical hardware Volume Down button. (Note: On certain models, the boot key trigger might require the Volume Up key, or a specialized boot cable instead).
-
While holding down that button firmly, connect the device to your PC using a high-grade USB data cord.
-
The utility interface grid rows will instantly detect the device signature, register a “Downloading” state string progress line, and flash the
FDL1andFDL2system components. You can now release the volume key safely.
Step 5: Verify the Passed Completion State
-
Flashing Loop: Leave the connection completely undisturbed while the engine formats system blocks and uploads the core system partitions sequentially.
-
Completion: Wait patiently until the operational row status block turns green and prints a clean “Passed” or success confirmation message.
-
Reboot: Click on the Stop Download icon (the Square Stop button) inside the top menu pane, unplug the phone USB cable wire, and power your device back on to finish the factory initialization!