Rooting the Pixel 9 Pro isn’t complicated once you know where everything is. The main thing that trips people up is finding the right boot.img for their exact Stock ROM. As long as that matches, the rest is pretty straightforward.
I’m using FW Manager here because it saves a lot of time. You can still root manually if you want, but honestly there’s no reason to when the utility already does all the boring work.
Requirements
Before starting, make sure you already have:
- FW Manager
- The correct boot.img for your Stock ROM (if you plan to do it manually)
- Bootloader unlocked
- USB debugging turned on
- Supported Model : Pixel 9 Pro
Rooting the Pixel 9 Pro/XL/A (Fully Automatic Method Tested)
(Max time 5 min with Integrity, Max time 2 min without Integrity…)
If you don’t want to manually search for Stock ROM, this is the easiest & safest way.
1. Unlock bootloader
You can skip if it’s already done. Without it, nothing will flash.
2. Turn on USB Debugging
Developer options → USB debugging → enable.
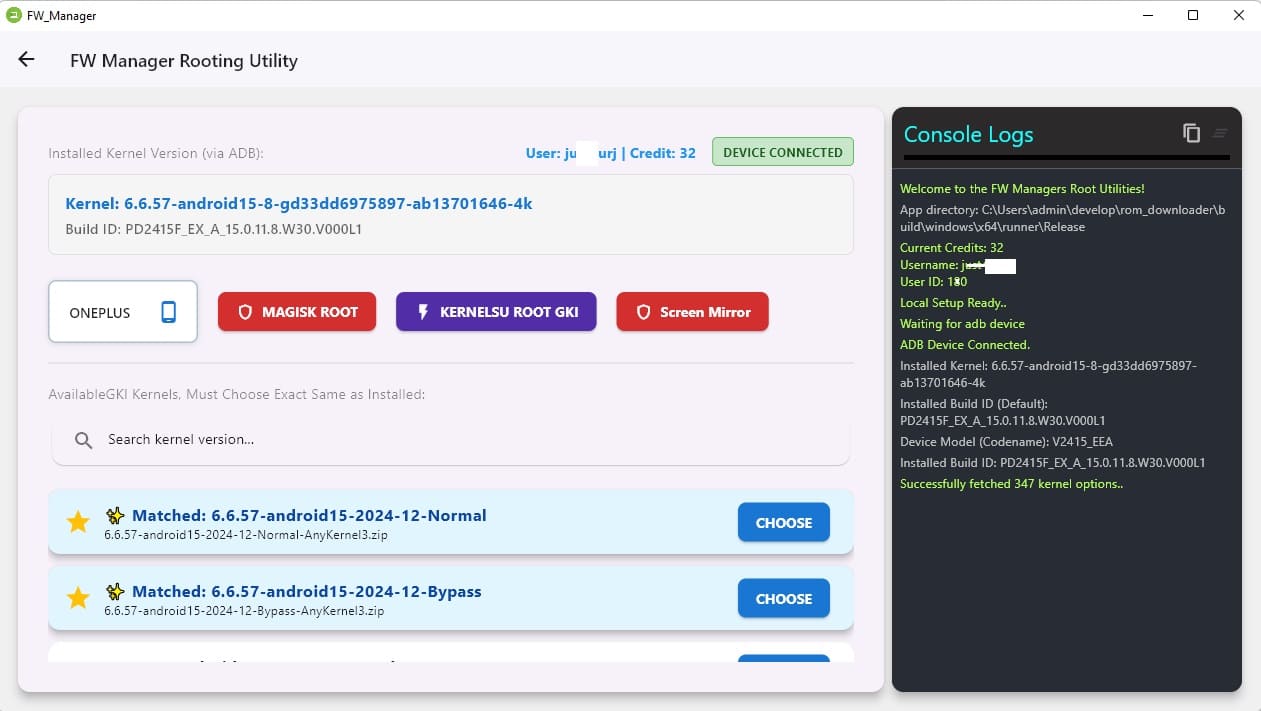
3. Open FW Manager
Log in, tap the menu, and pick Root Tool.
4. Choose Brand = Google
Plug the phone in. After a moment, the utility shows your kernel info, Stock ROM details, and whether the device is supported with KernelSU.
5. Check the detected kernel
You’ll see your matched kernel/build at the top.
6. Press Choose
Now the utility asks how you want to supply the boot.img:
-
Browse manually: pick the correct boot.img from your Stock ROM.
(If the version doesn’t match, it will probably boot issue.) -
Auto Download (4 credits): FW Manager will fetch the Stock ROM, extract the boot.img, patch it, and move on automatically. & its advance algo can do this without downloading the full Stock ROM..

7. Wait for patching and flashing
The utility handles everything. Just don’t disconnect the phone.
8. After restart, open WildKSU
Once the phone boots, launch the Wild KSU app and allow root access for shell.
9. Back in the utility, choose Activate Device Integrity
This installs the required modules — SUSFS and a few others — so the device keeps good integrity while rooted. It reboots automatically once it’s done.
10. That’s it
You now have KernelSU GKI root functioning with proper integrity fixes.
Using Magisk Instead
If you don’t want KernelSU, the process is the same.
Just pick Magisk Root inside FW Manager instead of choosing a kernel. The utility handles everything else correctly the same way..
Manual Method (Suitable for advance users):
- Search currently installed Stock ROM
- Download & extract boot.img from it
- Patch the document with ksu or magisk app
- Write it from fastboot
fastboot flash boot boot.img
fastboot reboot
Device Integrity:
- SUSFS not supported in Magisk, You have to root with KenelSU
- Install other modules like, play integrity, zygisk, Keybox etc and restart the device.