Flash Samsung Phone [Full Guide]-
as we know each Device come with a different chip and SoC and flashing Method are different on Different phone, if you have a Samsung phone then this article is for You, in the article we share a Step by Step Firmware installation Guide for Samsung Devices.
Pre- Require Files-
| File Name | Download |
| odin | Download |
| Driver [Must Require] | Download |
| Firmware [type phone Model in site search box] | Download |
| Backup NVRAM [Must Require] | Go–Here |
How to Install official Firmware on Samsung-

Step-5) Connect your Galaxy Device to your PC with the data cable and reboot into the Download/Odin mode.
Step-6) To enter into download mode turn off your phone and press and hold the ‘Home + Volume Down + Power’ buttons together until you see the download mode screen.
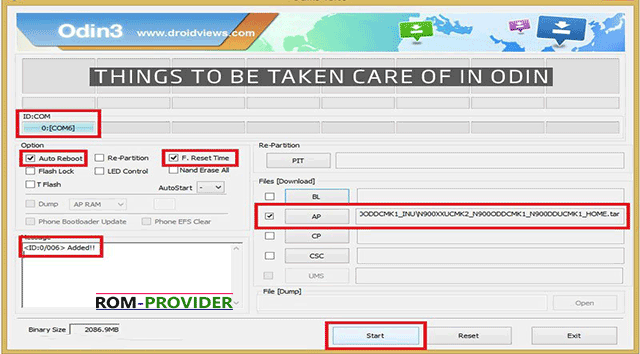
Step-7) Once you enter into Download mode, you see anID: COM port turned blue and Added message in Odin message box means your device has recognized by Odin.
Step-8) If ID: COM doesn’t show means your driver is not correctly installed or try it with different USB cable.
Step-9) Now locate and add the Firmware–xxx..tar file (You downloaded from above) to the AP/PDA tab in Odin.
Step-10) Make sure that only these two options are tick “Auto Reboot” and “F.Reset Time“
Step-11) Now click ‘Start‘ button and it will start flashing the file. Wait until you see ‘Pass‘ in Green Color on Odin screen. This step will Install TWRP Recovery On Your Samsung Device.


