
IMEI Baseband Repairing on Infinix S5 Pro:
Step by Step Guide to Repair IMEI Number , unknown baseband on Infinix S5 Pro, if You own a Infinix S5 Pro Smartphone having No IMEI issue then You can Repair it by following below Instructions.
Infinix S5 Pro Run on android 10 & it is Powered by Mediatek MT6765 Processor. it is a Dual SIM (GSM) Smartphone Support Nano-SIM cards. Connectivity options include Wi-Fi, GPS, Bluetooth, USB OTG, FM, 3G. The Device Come With 4GB of RAM and 64GB of Internal Storage that Can be Expandable via SD card.
Note:
- First Make a Complete backup of Your Phone.
- Please Do carefully, We are Not Responsible for any Damage to Your Device.
- Ensure that Your Device at-least 50% Charge to Prevent accidental Shut down during the flashing Process.
Download:
Database Files & tools:
Steps to Repair IMEI Number on Infinix S5 Pro:
- Download and Extract the SN Write tool to your computer
- Now open the file SN Writer.exe. From the Next Screen Click on COM Port and Select USB COM
- Click “Target Type” and select “Smartphone” (only if you want to Write IMEI on Sour Smartphone.
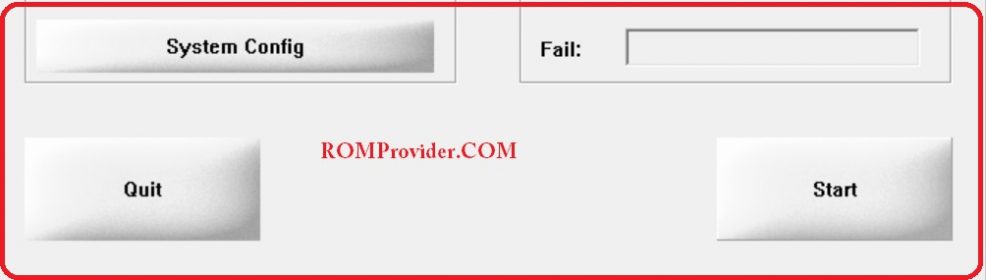
- Click the “System Configuration” button.
- From the System Config Screen, select IMEI, BT address and Wifi address in the Write option.
- If You have Dual SIM Device Check Dual IMEI Option For WIFI, Mac & BT address Check and Write…
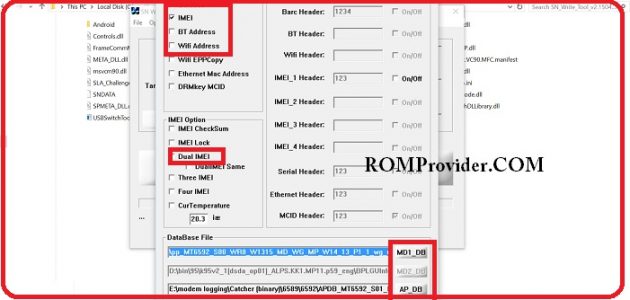
- in the “Database File” Section, add “MD1_DB” and “AP_DB” (both files are supplied with the firmware of Your device/Download From above). Then Click on Save and then Click Start.
- Now in the “Scan Data” section, Enter IMEI_1 and IMEI_2, Bluetooth address, Wifi address and click “OK”.

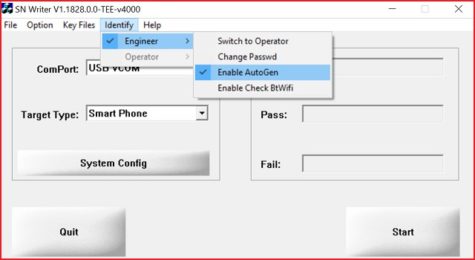
- Enable AutoGen as shown on the picture below, then select the same items you selected on the System Config page except IMEI, since you need to enter your original IMEIs and MEID Manually. (BT and Wifi addresses will be auto generated)
- Connect Your Switched Off Phone to PC with usb, (again Select usb COM Port if Not Selected) Click Start
- wait until Success. Done.